Have you ever thought of making your Windows 8 Laptop into Wifi Hotspot? If not, then you might probably don’t know that it is possible to share the internet over other devices by creating personal HotSpot via Laptop. Ofcourse, it possible with Smartphones and can be enabled at a touch of button but what about Laptop.
Most of the Windows laptops come with inbuilt WiFi card which helps to share the existing network. It helps to access the ethernet internet over the air on the other devices likes laptops, smartphones etc. However, there are few limitations too. You need to check whether your laptop supports the sharing or not. If you laptop is capable of doing so, then proceed further to make your windows 8 laptop into WiFi hotspot without using any softwares like Connectify, VirtualRouter Plus etc.
Turn Windows Laptop into Wifi Hotspot
This tutorial is completely based on the commands. True, you don’t need to download or install any third party client software to perform this task of sharing internet connection over the air with any router. Follow the steps carefully to know how.

1. Make sure to check whether your Windows laptop network adapter supports this feature or not. To do this, open command prompt with administrative privileges (this is must) and run the following command.
netsh wlan show drivers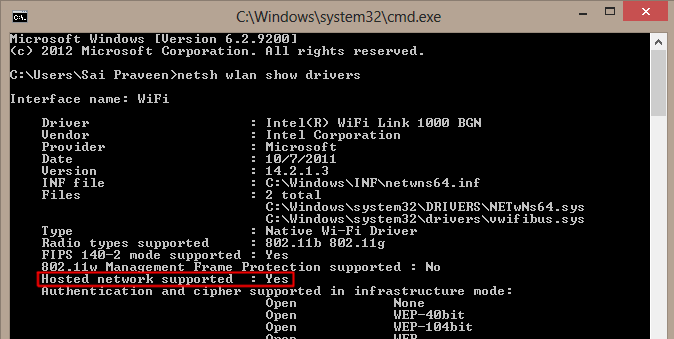
If it returns “No” then it is not possible you to share the internet. If it shows “Yes” move further to step 2.
2. Now type the following command to switch on the sharable adapter
netsh wlan set hostednetwork mode=allow ssid=YourName key=AnyPassword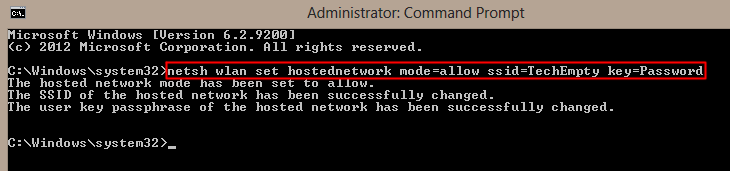
3. After switching on the network adapter, let’s share it by typing the command as follows
netsh wlan start hostednetwork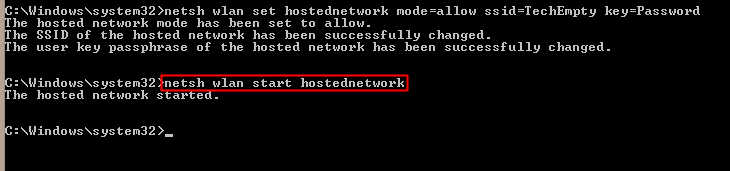
4. Check the statistics by typing the following command in order to turn laptop into Wifi Hotspot
netsh wlan show hostednetworkYour are done.
Enabling Local Area Network to share the internet
1. Open command prompt and type “ncpa.cpl” without quotes.
2. It wil open up a window with lots of connection types. Select the one which is currently in active state (from which you are accessing Internet).
3. Right click on it and select “Properties“
4. In the Sharing tab, check mark “Allow other network users to connect through this computer’s internet connection”. Confirm it by selecting “Ok“.
Now switch on the WiFi on other device(s). You will get SSID name. Select it and enter the password we have created in step 3 in first section to get connected.
In case if you struck at “Obtaining IP Address”, you should enter the IP address manually. Follow the procedure below
Showing Obtaining IP Address!
On your Smartphone, expand the options at WiFi settings and enter the IP address manually like 192.168.1.10 and Gateway as 192.168.1.1. Mostly, it works. If you are still getting any errors, please do let us know via comment section.
This is the best feature available in all windows machines. You don’t need any external software to make your Windows 8 laptop into WiFi HotSpot.
Check out the video tutorial for step by step procedure

Ok so I fixed it then it said you must run this command from a command prompt with administrator privilege
What is the password when connect to wifi on phone?
thanks for providing this information !!
if i switch off my laptop and again i turned it on whether i should repeat the above process again
Hello,
I used this method to turn on my Laptop(Windows 8) hotspot and it worked but after that, i am not able to use any wifi on my laptop. When I connect, it connects and shows normal signals but there is no internet access at all… I tried many wifi connections but the same result…please guide me.
What if the network conection is under proxy?